Showing posts with label tips. Show all posts

Tuesday, February 5, 2013

How To: Prepare a Brownie Pan

I included this tutorial for preparing an 8X8 brownie pan in my Mini Cadbury Egg Blondies post, but this tip is so useful I think it deserves its own post. You can use this method for blondies, brownies, and bar cookies. It adds a little more time to your recipe preparation, but I promise it's worth the extra step. No more slicing through brownies while holding your knife at an awkward angle. No wasted, crumbled pieces because the first few brownies are impossible to get out of the pan in one piece! Simply line, lift, slice, and serve.

**You may read this and think, "What a waste of tin foil!" Feel free to reuse the foil more than once. I would not, however reuse the parchment paper. This tip works best on 8X8 pans, but will work well for a 9X9 as well. Any larger and you risk crumbling when lifting out of the pan.** 


Cut an 8x8 square of parchment paper. You can measure using a ruler or simply trace the bottom of your baking dish.


Spray the dish with cooking spray. Lay two long strips of aluminum foil in the pan, forming an X. I tear a long sheet of aluminum foil, cut it in half, then fold each half into thirds. This forms two reinforced strips. Leave a few inches of foil hanging off the sides to create "handles."


Lay the 8x8 parchment paper square over the foil. Spray the parchment with cooking spray. This parchment/foil apparatus will allow you to lift the entire batch of blondies, brownies, or bar cookies out of the pan (after they are baked and cooled), making it very easy to cut them into neat, even squares.


When cool, use the aluminum foil "handles" to lift blondies, bar cookies, or brownies out of the pan.


Transfer to a cutting board to slice...and sample:)

Thursday, December 13, 2012

How To: Roast a Bell Pepper

Roasted bell peppers taste completely different, and dare I say, SO MUCH better, than their raw counterparts. You can buy them pre-roasted from a supermarket, but they cost much more than raw bell peppers from the produce section. I will let you in on a little secret. If you have 10 minutes, a gas stove, or an oven with a broiler, you can roast peppers in your kitchen at home. You can have freshly roasted peppers that are much more flavorful than the storebought version any time you want! So, why buy something when you can make it better yourself and save money? 

There are three methods to roasting your own pepper: the broiler, grill, and gas stove method. For all three methods you will need a whole pepper (bell, italian, jalapeño, serrano, etc) and a resealable plastic bag.

**Broiler Method: Preheat your broiler to high and move the oven rack to the top third of the oven. Cut the pepper in half and remove the vein and seeds. Place the peppers on a sheet pan with the skin side facing up and place pan in the oven. To achieve an even char, you will need to keep an eye on the pepper and rotate the pan until the skin is black on all sides. Remove the peppers from the oven and place in a resealable plastic bag. Seal the bag and set aside until cool to touch

**Gas Stove & Grill Method: Turn a gas element to high heat. Place the pepper on the element, directly above the flame. Using tongs, turn the pepper frequently to allow for even charring. When the skin is black on all sides, place the pepper in a resealable plastic bag and seal. Allow to cool. 


The purpose of placing the pepper in a bag is to allow for very easy peeling once cool. The condensation and heat that collects in the bag keeps the skin soft enought to rub off the pepper. Do not rinse your roasted pepper! This rinses away all the flavor. Once the pepper is cool, roughly rub the pepper skin until it peels away.


Look at that smoky tender vegetable! Once your pepper is peeled, chop, dice, mince, slice, and use in your favorite recipe.

Wednesday, December 5, 2012

How To: Dice an Onion Like a Pro

Do you ever watch cooking competition shows like Top Chef, Chopped, and Iron Chef and get really jealous of their ninja-like knife skills? I DO! The chefs on these shows move their knives with such precision and speed, creating uniform cuts of various ingredients, it seems they could dice a pound of potatoes blind-folded! I feel better about my tortoise-like-by-comparison knife skills when I think of the many hours of repetitive movement, hand cramping, and boxes of band-aids the chefs had to endure before reaching the skill level we see on TV. However, I do have some insider knowledge of how cooks and chefs chop so perfectly and I'm going to share them with you!

We will start with onions. I have a love/hate relationship with onions. I love eating onions: French onion soup, pearl onions in a stew, caramelized onions on a flatbread pizza, all of it is delicious! But I hate cutting them. I dread cutting them. I've tried holding a matchstick between my teeth, wearing glasses, all of the old wives' tales that supposedly keep you from crying your eyes out. They don't work. In the end, I've found it best to fight through the tears and eagerly await the final product. It's always worth it in the end!

Now, the lesson! Remember what I said earlier, no chef began chopping onions at lightening speed. It took years of practice and undoubtedly a few cuts to their fingers along the way. Practice makes perfect, so be patient with yourself.

First, some onion anatomy. An onion has two ends; the hairy root end and the pointy grow end.


Remove the outer paper-thin layers.


Cut the onion in half through the root end. You should have some of the hairy root end on both halves of your onion. This is very important! The root will hold the onion together while you make the various cuts.


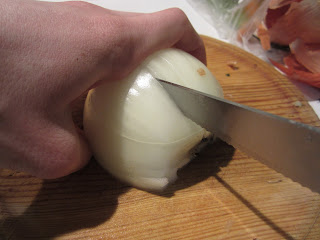
Place the onion flat-side down on your cutting board. Pressing firmly on the top of the onion with your free hand, make 3-4 horizontal cuts across, but not completely through, the onion. 


Rotate the onion one quarter turn toward you so the root end is facing away from you. Make 3-4 vertical cuts perpendicular to the cutting board all the way through the onion.


At this point, your onion should look like this with horizontal and vertical cuts. Now, prepare to feel like a Top Chef!


Rotate your onion one quarter turn away from you. Keeping your fingers out of the way, make vertical cuts through your onion. Start at the grow end and work your way toward the root end. Watch as the diced onion pieces fall uniformly onto your cutting board!


Now, sometimes you will want a large dice and other times you'll need to finely dice your onion. The more horizontal and vertical cuts you make, the smaller the pieces in the final product. This method is faster (less exposure to the onion=less crying!), creates a more uniform cut (no struggling with smaller pieces burning while larger pieces need more time to cook), and makes you feel like a professional (move over Bobby Flay!)

Saturday, November 24, 2012

Quick Buttermilk Substitute

It's going to happen. More than once. You will be mid-recipe when you'll realize-yikes!-you don't have a vital ingredient. Ideally, you should make sure you have your entire ingredient list before beginning a recipe because sometimes your mental list of the contents of your pantry differs from the actual inventory of your pantry. Thank goodness for easy substitutes. In the case of buttermilk, all you need is regular milk and lemon juice or vinegar. It's not as good as the real thing, but it will do in a pinch!

Living in Spain, some recipes consist entirely of substitutes. It's very challenging and frustrating to be out of my element (pun) when cooking in another country, but it also forces me to get creative! I could not find buttermilk anywhere in the supermercado for my buttermilk pancakes, so I bought milk (which comes in a cardboard carton over here) and a lemon instead.

This recipe makes 1 cup of buttermilk. Multiply or divide to get the amount your recipe calls for. 

Buttermilk Substitute

Ingredients:
 

1 Tbsp acid (lemon juice or white vinegar)
15 Tbsp (just under 1 cup) dairy (milk, heavy cream, or half & half)

Directions: 

In a liquid measuring cup, combine acid and milk. Let sit for 5 minutes. Continue your recipe!

How to: Microwave Poached Egg

Cooking for one. It happens in dorm rooms, apartments with old appliances, or houses stuffed with so many roommates, you have to play tetris with all the items in your fridge to find a space for your milk jug.  Still, I see none of those conditions as an excuse for Ramen noodle and mac & cheese dinners every night. No one deserves that boring dining experience. My escape from boxed meals is the incredible, edible egg. You can make SO many inexpensive, quick, and tasty dishes for breakfast, lunch, and dinner with this thing! Many are familiar with the basic scrambling, frying, and hard boiling, but my cooking method of choice is neither of these. It's poaching.

Poaching eggs is done in a pot of simmering water with a splash of vinegar. It is a delicate process because the egg will easily fall apart and leave you with something resembling extremely watered-down egg drop soup if something goes wrong. While it's definitely worth the time to learn how to correctly poach an egg, there is a very convenient shortcut for those days when you're starving and need to eat NOW. The shortcut is.....the microwave! All you need is 5 minutes, a microwave safe glass, cooking spray, an egg, and you've got yourself the makings of a healthy meal.


To start, spray the inside of a microwave safe glass, mug, bowl, etc with cooking spray. Fill the inside of your cup with 2 tsp of water, barely enough to coat the bottom of the glass. Crack your egg into the glass and sprinkle with a little salt and pepper.


Time to cook! Put the glass in the microwave and cook for 30 seconds for soft yolk or 1 minute for hard yolk. Remove from microwave. If there is water left over in the bottom of the glass, tip your glass to drain the water.


Use a spoon to gently remove your poached egg from the glass.


For breakfast, serve the egg with toast. For lunch or dinner, serve on top of salad greens topped with your favorite dressing.

Monday, January 2, 2012

Knife Skills: Chopping, Fanning, & Mincing

It is said in kitchens, your #1 tool is your hands followed by your #2 tool, your chef's knife. I feel that this rating system is extremely unfair to my long-suffering Kitchen-Aid mixer, but I still believe it is important for every cook to have a basic knowledge of knife skills. This way, when you run into a recipe with an ingredient that says 2 tsp. minced, or 1/4 cup chopped, you'll know just what to do!

Chopping is a rough cut that simply means to break into smaller pieces. To chop things for baking, chocolate chips, dried fruit, candies, etc, I resort to the fanning method.


To begin, gather the item to be chopped on a cutting board. Keeping one hand on the knife handle and the other on the top of the knife point, raise up and cut down repeatedly. This is before position (A)....


and this is the after position (B). Repeat positions (A) and (B) sweeping knife in a fan shape from left to right across the chips, fruit, candies, etc.  Fanning. No problem right? Now onto mincing.


Mincing is a very small cut made by slicing the item into julienne strips then further slicing the julienne strips into small minced squares. The minced item is this demo is crystallized ginger. Here we go!


Slice the ginger into small strips keeping your fingers OUT OF THE WAY. This cut is called a julienne. It creates spears or strips out of whatever you're slicing. Gather the julienne strips together, and turn the bunch 1/4 turn clockwise. 


Using your knuckles as a guide, slice repeatedly, creating tiny squares of ginger, until you have reached the edge of the julienne strips.


Now you have a bunch of tiny squares. If you need to make something smaller yet, simply fan your knife a few times through the minced squares.


It's always important to remember that your julienne cuts, minced cuts, etc do not need to be perfect. You're going to be mixing these into a batter and blasting that in the oven, so if your cuts are not identical, don't worry about it. If the recipe is delicious, your eaters will forgive you.