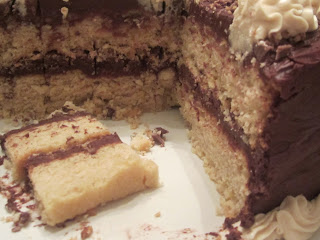
This is NOT a cupcake. I wrestled with the title of this post, because this cake needs to bear the name of my absolute favorite food in the world - the Reeses Peanut Butter Cup. This is a peanut butter cup...wait for it...cake. Not a peanut butter cupcake. Now, onto the recipe!
When dreaming up this cake, I wanted to use my favorite Cocoa Frosting and stay true to a peanut butter cup: luscious peanut butter coated with creamy chocolate. Thus, this variation on basic yellow cake was born, Peanut Butter Layer Cake. Naturally, I had to add peanut butter cup pieces to the cake as well. When I tried the cake the first time, there just was not enough peanut butter flavor to compliment the chocolate frosting. How did I fix this? I added more frosting! Is there such a thing as too much frosting? My Peanut Butter Cream Frosting brings all the flavors in the cake together in the perfect balance of peanut butter and chocolate, inspired by the masterfully crafted Reeses Peanut Butter Cup! I´ve said this before and will say it again- HOW can they not sell these in Europe?
After the Peanut Butter Layer Cake has cooled completely, place one layer on a cake plate or stand. Spread with a generous layer of Cocoa Frosting.
Roughly chop a dozen mini peanut butter cups.
Scatter the pieces on top of the frosted cake layer.
Top with the second cake layer and frost with remaining Cocoa Frosting. Dump the frosting on top of the cake, then gradually work your way outward, smoothing the frosting toward the edges and down the sides of the cake with an uneven spatula.
If you want a polished final product, dip the spatula in hot water and run along the sides of the cake to smooth the frosting. This step is purely aesthetic. The cake will taste the same either way!
Prepare a piping bag (or resealable plastic bag with a corner cut off) and fill with the Peanut Butter Cream Frosting.
Pipe the frosting as desired on the top and around the base of the cake. Piping frosting around the base of a cake is a great way to hide mistakes and little imperfections at the base of a cake. The professionals do it too!
When dreaming up this cake, I wanted to use my favorite Cocoa Frosting and stay true to a peanut butter cup: luscious peanut butter coated with creamy chocolate. Thus, this variation on basic yellow cake was born, Peanut Butter Layer Cake. Naturally, I had to add peanut butter cup pieces to the cake as well. When I tried the cake the first time, there just was not enough peanut butter flavor to compliment the chocolate frosting. How did I fix this? I added more frosting! Is there such a thing as too much frosting? My Peanut Butter Cream Frosting brings all the flavors in the cake together in the perfect balance of peanut butter and chocolate, inspired by the masterfully crafted Reeses Peanut Butter Cup! I´ve said this before and will say it again- HOW can they not sell these in Europe?
After the Peanut Butter Layer Cake has cooled completely, place one layer on a cake plate or stand. Spread with a generous layer of Cocoa Frosting.
Roughly chop a dozen mini peanut butter cups.
Scatter the pieces on top of the frosted cake layer.
Top with the second cake layer and frost with remaining Cocoa Frosting. Dump the frosting on top of the cake, then gradually work your way outward, smoothing the frosting toward the edges and down the sides of the cake with an uneven spatula.
If you want a polished final product, dip the spatula in hot water and run along the sides of the cake to smooth the frosting. This step is purely aesthetic. The cake will taste the same either way!
Chop a few more peanut butter cups and scatter on top of the frosted cake.
Prepare a piping bag (or resealable plastic bag with a corner cut off) and fill with the Peanut Butter Cream Frosting.
Pipe the frosting as desired on the top and around the base of the cake. Piping frosting around the base of a cake is a great way to hide mistakes and little imperfections at the base of a cake. The professionals do it too!
Cut into the cake and share Reeses peanut butter chocolate perfection with your family and friends!


No comments:
Post a Comment