Showing posts with label frosting. Show all posts

Thursday, December 13, 2012

Peanut Butter Cup Cake

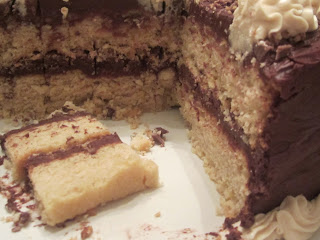
This is NOT a cupcake. I wrestled with the title of this post, because this cake needs to bear the name of my absolute favorite food in the world - the Reeses Peanut Butter Cup. This is a peanut butter cup...wait for it...cake. Not a peanut butter cupcake. Now, onto the recipe!

When dreaming up this cake, I wanted to use my favorite Cocoa Frosting and stay true to a peanut butter cup: luscious peanut butter coated with creamy chocolate. Thus, this variation on basic yellow cake was born, Peanut Butter Layer Cake. Naturally, I had to add peanut butter cup pieces to the cake as well. When I tried the cake the first time, there just was not enough peanut butter flavor to compliment the chocolate frosting. How did I fix this? I added more frosting! Is there such a thing as too much frosting? My Peanut Butter Cream Frosting brings all the flavors in the cake together in the perfect balance of peanut butter and chocolate, inspired by the masterfully crafted Reeses Peanut Butter Cup! I´ve said this before and will say it again- HOW can they not sell these in Europe?


After the Peanut Butter Layer Cake has cooled completely, place one layer on a cake plate or stand. Spread with a generous layer of Cocoa Frosting.


Roughly chop a dozen mini peanut butter cups.


Scatter the pieces on top of the frosted cake layer.


Top with the second cake layer and frost with remaining Cocoa Frosting. Dump the frosting on top of the cake, then gradually work your way outward, smoothing the frosting toward the edges and down the sides of the cake with an uneven spatula.
 

If you want a polished final product, dip the spatula in hot water and run along the sides of the cake to smooth the frosting. This step is purely aesthetic. The cake will taste the same either way!
 

Chop a few more peanut butter cups and scatter on top of the frosted cake. 


Prepare a piping bag (or resealable plastic bag with a corner cut off) and fill with the Peanut Butter Cream Frosting


Pipe the frosting as desired on the top and around the base of the cake. Piping frosting around the base of a cake is a great way to hide mistakes and little imperfections at the base of a cake. The professionals do it too!


Cut into the cake and share Reeses peanut butter chocolate perfection with your family and friends!

Wednesday, December 5, 2012

Peanut Butter Cream Frosting

I have discovered something truly shocking during my time abroad. Spaniards think peanut butter is gross! It seems they more than dislike it. I know I'm making a generalization here as I have not met the entire country, but on a few instances I have gotten this impression. I was presenting to the 5th grade class about food in America and was explaining how we are all raised on peanut butter and jelly sandwiches. They asked what the PB&J stands for and when I told them peanut butter, crema de cacahuete, they wrinkled their noses in disgust! Another time I generously offered a Reese's peanut butter cup to a friend and he declined because of the peanut butter. This is one cultural difference I can not understand. 

No matter where in the world I'm living, I will always regard peanut butter as the king of spreads. For me, it reigns over Nutella, Biscoff, cream cheese, and jelly. This frosting pairs perfectly with the Cocoa Frosting and Peanut Butter Layer Cake to make the fabulous, 100% American, Peanut Butter Cup Cake that I will post later next week. Stay tuned and enjoy this recipe in the meantime.


 To make this very quick frosting, make sure all of your ingredients are at room temperature.


In a stand mixer fitted with a paddle attachment, beat the butter and peanut butter until smooth and fluffy, 2 minutes. Beat in the vanilla. With the mixer on low speed, gradually add powdered sugar. Add the buttermilk 1 Tbsp at a time until desired, spreadable consistency. Beat on high speed for 2-3 minutes. 


Frost cupcakes, spread on graham crackers, or put in a piping bag to create the Peanut Butter Cup Cake! To frost an entire cake, double or triple this recipe.

Peanut Butter Cream Frosting

Recipe by Sweet & Savory

Ingredients:
 
1/3 cup unsalted butter, room temperature
1/3 cup smooth peanut butter
1 tsp vanilla
1 cup + 2 Tbsp powdered sugar
2 Tbsp buttermilk

Directions:

In a stand mixer fitted with a paddle attachment, beat the butter and peanut butter together on high speed until smooth, 2 minutes. Beat in the vanilla. Gradually add the powdered sugar, beating on low speed after each addition until combined. Add the buttermilk 1 Tbsp at a time until the mixture reaches frosting consistency. Beat the frosting for 2-3 minutes on high speed.

Thursday, November 22, 2012

Sunshine Cupcakes

A few summers ago, I vacationed in upstate New York at the Finger Lakes at my friend's lake house. I know right?! Before you get too jealous of my wonderful connections, I'll tell you that it rained 75% of the time I was there, ruining my plans to sunbathe and water ski to my heart's content. (I have fair skin and can not tan and I've never water skiied a day in my life, but when imagining a summer on a lake one fantasizes of these things.)
One day my friend's neighbor kindly brought us treats. She had baked a "sunshine cake" and I laughed at the irony of it. Also, the fact that the cake was chilled made it seem even less sunny to me. However, with the first bite of my slice, all my cynicism was obliterated by the fresh citrus punch of the cake. The mandarin oranges lend a sweet moisture to the cake while the smooth cream cheese mixed with tangy pineapple compliment the cake to create a citrus "sunny" flavor.


Preheat oven to 350 degrees Fahrenheit. Line 24 cupcake tins with paper liners. In your stand mixer with the paddle attachment, mix cake mix, eggs, canola oil, and mandarin oranges on low speed until completely combined, then continue to mix on high until fluffy (2-3 minutes)
 

Fill cupcake liners 2/3 of the way full and bake for 20-25 minutes until they look like this


Golden brown. Let rest in pan for 5 minutes then transfer to rack to cool completely.


Beat cream cheese and butter in stand mixer with paddle attachment until fluffy. Add vanilla, sugar, drained pineapple, and Jello mix and beat until fluffy...er. Add yellow food coloring, if you want your frosting to be extra sunny. I didn't, but next time I will! 


 Frost your cooled cupcakes or eat the frosting with a spoon....I won't judge


I wish my camera could pick up the moisture content of these cupcakes. Garnish with candied lemon peel, orange peel, colored sugar, etc if desired. Stick them in the fridge. Room temp, these cupcakes are pretty good, but cold and rested they are AMAZING! So try to be patient.

Sunshine Cupcakes:

recipe by Sweet & Savory

Ingredients: 
 
Cupcakes:
 
1 box yellow cake mix
4 eggs
1/4 cups canola oil
1 can (11 oz) mandarin oranges, undrained and crushed

Pineapple Cream Cheese Frosting:

8 oz cream cheese, room temperature
1 cups (2 sticks) salted butter
1 tsp. vanilla extract
1 can (20 oz) crushed pineapple, drained
1 cups powdered sugar
1 box Jello cheesecake mix
yellow food coloring, if desired

Directions:

Preheat oven to 350 degrees Fahrenheit. Line 24 cupcake tins with cupcake liners. In stand mixer with paddle attachment, beat cake mix, eggs, and vegetable oil until combined. Scrape the sides of the bowl with rubber spatula. Add crushed mandarin oranges with juice and beat for 3 more minutes.

Fill each cupcake liner 2/3 of the way full with batter. Bake 20-25 minutes until golden brown. Let rest in pan for 5 minutes, then remove to wire rack to cool completely.

While the cupcakes are cooling, make the frosting. In a stand mixer with paddle attachment, cream butter and cream cheese until fluffy. Add vanilla, pineapple, powdered sugar, and Jello mix and beat until combined. Stir in a few drops of yellow food coloring, if desired.

Have at it! Frost your cupcakes and refrigerate for at least 1 hour to overnight before serving.

White Chocolate Cranberry Bars

During this holiday season, I needed a high yield dessert recipe for a Christmas potluck. I'd had my fill of pumpkin pie and all things chocolate, so I choose to bake my take on Starbuck's seasonal Cranberry Bliss Bars. These fly off the shelves at the coffee shop each year and mine were a huge hit at my potluck. The distinct flavors and textures of the sweet, crunchy, red cranberries, tangy orange zest, and fragrant yellow crystallized ginger are all tied together by the creamy white chocolate in this fall brownie-like dessert.

Note: buy your crystallized, or candied ginger at an Asian market. At Smith's 2 ounces costs $10.99. I got mine for $3.99 for 10 oz at my nearby Asian market. Do not panic if you can't use it immediately. When stored in an air tight container, crystallized ginger has a 2 year shelf life.


Preheat the oven to 350 degrees Fahrenheit and spray a 9x13" baking pan with cooking spray. I like Baker's Joy because it takes care of the buttering AND the flouring of your dish for you!


Cream your butter and brown sugar together until light and fluffy 2-3 minutes. Add eggs one at a time, scraping the sides of the bowl after each addition.


Add vanilla and minced crystallized ginger. Mix to combine. Combine dry ingredients in a separate bowl.


Slowly add in increments the dry ingredients to butter and sugar mixture with the mixer on low speed. Scrape the bowl. Add white chocolate chips and chopped craisins and mix by hand until just combined.


Evenly spread batter into prepared baking dish. Bake 20-25 minutes until the edges look like.....


This! Golden brown. Let cool completely before frosting.


While the bars cool, prepare the frosting. Beat cream cheese and powdered sugar while gradually adding lemon juice, 1 tsp. at a time. Add vanilla extract and orange zest and beat until combined.


The frosting should be thick like this. Set frosting aside while you prepare the white chocolate drizzle.


Place shortening and white chocolate chips in a heat proof bowl over a saucepan filled with 1 inch of simmering water.


This is called a double boiler. (It's a good technique to be familiar with, but if you're short on time, melt the chocolate and shortening in the microwave)


Allow to melt slightly on the double boiler, then whisk until smooth. Pour into a Ziploc bag and set aside.


Time to build! Spread frosting evenly on cooled bars.


Sprinkle with chopped craisins.


Snip one corner of the Ziploc bag with the white chocolate drizzle in it and drizzle over bars in a criss cross pattern. Refrigerate for at least 1 hour. I like to cut mine into triangles. Make 5 vertical slices and 3 horizontal slices. This gives you 24 bars. You can stop here, or do what I do and make a diagonal slice through each bar creating 2 triangles. This gives you 48, three-bite triangle portions.


Aren't the triangles cute? I think so. I also think if you are able to wait a full calendar year between gnoshing on these fall treats you are a superstar. I'll be making these in the spring, summer, and winter as well!


I had to post this. I let my dog sample the batter while I was cleaning up. She approves!

White Chocolate Cranberry Bars 

Recipe adapted from Starbucks Cranberry Bliss Bars by Todd Wilbur

Ingredients:

Bars:
1 1/2 sticks unsalted butter
1 1/4 cups packed brown sugar
3 eggs
1 1/2 tsp. vanilla extract
3 T crystallized ginger, minced
1 1/2 cups flour
1/2 tsp. fine salt
1/2 tsp. baking powder
1 1/4 cups craisins, chopped
3/4 cups white chocolate chips

Frosting:
4 oz. cream cheese at room temperature
3 cups powdered sugar
4 tsp. lemon juice
3 tsp. orange zest
1 tsp. vanilla extract
1/4 cups craisins, chopped

White Chocolate Drizzle:
3/4 cups white chocolate chips
2 tsp. shortening

Directions:

Preheat oven to 350 degrees Fahrenheit. Spray a 9x13" baking dish with cooking spray. In a standing mixer fitted with a paddle attachment, cream butter and sugar until light 2-3 minutes. Add eggs one at a time, scraping the bowl between each addition with a rubber spatula. Add vanilla extract and crystallized ginger and mix to combine.

In a separate bowl whisk flour, baking powder, and salt. With the mixer on low speed, add the flour mixture to the butter and sugar mixture gradually until just combined. Scrape the bowl, incorporating any remaining flour into the batter. Mix white chocolate chips and craisins into batter by hand.

Evenly spread batter into prepared dish. Bake for 20-25 minutes until the edges are lightly golden brown. Let cool completely before frosting.

While bars are cooling, prepare the frosting. In a standing mixer with a paddle attachment, beat cream cheese and powdered sugar, adding lemon juice 1 tsp. at a time to reach thick frosting consistency. Add orange zest and vanilla extract and beat. Set aside.

In a double boiler, prepare the white chocolate drizzle. Melt white chocolate chips and shortening, whisking to combine thoroughly. Pour into Ziploc bag and set aside.

Time to build! Spread on top of cooled bars. Sprinkle the 1/4 cups chopped craisins evenly on top of the frosted bars. Make a small snip in one corner of the ziploc bag with the white chocolate drizzle in it. Drizzle over the bars in a criss cross pattern. Refrigerate bars for at least 1 hour before slicing. (or if you're impatient, pop them into the freezer for 30 minutes to let the frosting set.) Makes 24 bars or 48 triangle slices.

Sunday, May 20, 2012

Wedding Cake & Oreo Cream Cheese Frosting

It has been a while since my last post. Have I abandoned my little cooking blog in pursuit of other things? Never. I have been concentrating all of my efforts on my biggest culinary undertaking yet. That's right. I baked a wedding cake! And there it is in its 100 lb. glory. I'm not kidding it probably weighed that much! After months of conceptualizing, countless shopping trips for hardware and ingredients, only one teeny, tiny emotional meltdown, and a solid week of kneading fondant, whipping three kinds of buttercream, beating two kinds of cake batter, and hours, hours, HOURS of rolling and ruffling thin strips of fondant, I'm exhausted, proud, and I wish I could do it all over again!

The top and bottom tiers are chocolate cake with Oreo Cream Cheese Frosting. The cake is rich, dense, and oh so chocolatey, but the Oreo Cream Cheese Frosting is sublime. I'm surprised any made it on the cake as I could not keep "taste testing" it while making it. I baked the Vanilla Buttermilk Cake from Sky High: Irresistible Triple Layer Cakes cookbook for the middle tier and slathered my favorite Salted Caramel Frosting between the layers. The buttercream used for the crumb coat was Martha Stewart's Vanilla-Buttercream Frosting. The woman is a wedding cake wizard, so I knew her buttercream would be amazing. For the final step, the fondant, I was a little nervous. I do not like fondant and I usually take it off my cake at weddings. I baked my heart and soul into this cake, so I wanted the wedding guests to enjoy every bit of it, even the fondant. For that reason, I made my own fondant out of miniature marshmallows. Once melted and mixed with powdered sugar, the mini mallows for a sugar dough that behaves just like fondant but tastes a million times better! Also, I'm a baking snob so the idea of using boxed cake, canned frosting, or fondant from a tub was just NOT going to happen. The marshmallow fondant was worth the extra step.


The bottom tier of this cake was 16 x 16 x 4". I didn't realize how large of a cake that was until I bought the pan! As you can see, the pan fills up my entire oven. I used a heating core (that's the cone shaped thing in the center of the cake) to make sure the center of the cake baked at the same rate as the outside of the cake. When I baked the first layer of the monster chocolate base layer, I overfilled the pan. Can you guess what happened? I came to check on the cake's progress 30 minutes into baking, turned on the oven light, and saw streams of chocolate lava erupting from my pan and dripping onto the bottom of my oven! I started laughing. I think I was too stressed out and horrified to have a meltdown. After all, mistakes in the kitchen are never the end of the world. That's how you learn and improve!


After all the layers were baked (six total), frosted, and crumb coated with the vanilla buttercream, I covered them with a layer of marshmallow fondant and started making the ruffle detail. Using my pasta roller (very resourceful right?) I rolled out thin strips of fondant and attached them to the side of the cake. As a first time wedding cake decorator, I liked the idea of these ruffles because they don't have to be perfect. It's random elegance.


My sisters made the ribbon rolled roses out of gum paste. The wedding colors were ivory, brown, and green. Originally, the roses were going to be made of modeling chocolate, but we decided the brown would be too much of a contrast to the light ivory fondant.


We drove very very slowly to the wedding venue and set up the cake. I was so relieved it was all over and that the cake had made it safely! I had nightmares about dropping the cake on the way into the reception hall! But, there were no hiccups and everyone LOVED the cake. I had some for breakfast this morning. It's still good:)

Out of all the recipes used in this massive dessert, the Oreo Cream Cheese Frosting is my absolute favorite.  Use it to frost smaller cakes, cupcakes, graham crackers, or in between homemade Oreos!

Oreo Cream Cheese Frosting

adapted from cupcake project

Ingredients: 

1 8 oz package of cream cheese, room temperature ( i used neufchatel cheese)
1/2 stick unsalted butter, room temperature
1/2 tsp vanilla extract
4 cups powdered sugar
1 sleeve Oreo cookies, about 15 cookies

Directions: 

Pulse the Oreos in a food processor until the cookies are broken into pieces roughly the size of dimes.

In a stand mixer fitted with the paddle attachment, beat cream cheese and butter on high speed for 2 minutes until light and fluffy. Beat in the vanilla extract.

With the mixer on low speed, add the powdered sugar gradually until incorporated. Scrape down the sides of the bowl. Fold in the Oreo crumbs.