Do you ever watch cooking competition shows like Top Chef, Chopped, and Iron Chef and get really jealous of their ninja-like knife skills? I DO! The chefs on these shows move their knives with such precision and speed, creating uniform cuts of various ingredients, it seems they could dice a pound of potatoes blind-folded! I feel better about my tortoise-like-by-comparison knife skills when I think of the many hours of repetitive movement, hand cramping, and boxes of band-aids the chefs had to endure before reaching the skill level we see on TV. However, I do have some insider knowledge of how cooks and chefs chop so perfectly and I'm going to share them with you!


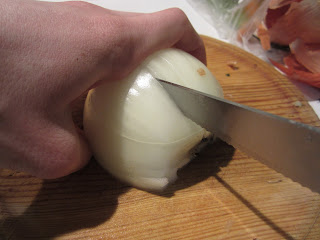


We will start with onions. I have a love/hate relationship with onions. I love eating onions: French onion soup, pearl onions in a stew, caramelized onions on a flatbread pizza, all of it is delicious! But I hate cutting them. I dread cutting them. I've tried holding a matchstick between my teeth, wearing glasses, all of the old wives' tales that supposedly keep you from crying your eyes out. They don't work. In the end, I've found it best to fight through the tears and eagerly await the final product. It's always worth it in the end!
Now, the lesson! Remember what I said earlier, no chef began chopping onions at lightening speed. It took years of practice and undoubtedly a few cuts to their fingers along the way. Practice makes perfect, so be patient with yourself.
First, some onion anatomy. An onion has two ends; the hairy root end and the pointy grow end.

Remove the outer paper-thin layers.

Cut the onion in half through the root end. You should have some
of the hairy root end on both halves of your onion. This is very important! The root will
hold the onion together while you make the various cuts.

Place the onion flat-side down on your cutting board. Pressing firmly on the top of the onion with your free hand, make 3-4 horizontal cuts across, but not completely through, the onion.

Rotate the onion one quarter turn toward you so the root end is facing away from you. Make 3-4 vertical cuts perpendicular to the cutting board all the way through the onion.

At this point, your onion should look like this with horizontal and vertical cuts. Now, prepare to feel like a Top Chef!

Rotate your onion one quarter turn away from you. Keeping your fingers out of the way, make vertical cuts through your onion. Start at the grow end and work your way toward the root end. Watch as the diced onion pieces fall uniformly onto your cutting board!

Now, sometimes you will want a large dice and other times you'll need to finely dice your onion. The more horizontal and vertical cuts you make, the smaller the pieces in the final product. This method is faster (less exposure to the onion=less crying!), creates a more uniform cut (no struggling with smaller pieces burning while larger pieces need more time to cook), and makes you feel like a professional (move over Bobby Flay!)


